How to Cut a Circular Garden Border
 Adding a circular border can add interest to your garden design
Making a circular border needn't be taxing if you follow this simple technique for creating round beds in your garden.
I was asked by the owner of a garden that I work in to change the size and shape of a border in their garden, turning it into a large circular border. The original shape was oval and it was much smaller than the intended new bed.
How could I cut out a new border, ideally into a perfect circular shape? The new intended shape was much to big to use a template, so I had to think of another more simple method. To give you a clue it was like going back to school!
Here is how I did it:
- I first decided where the centre of the new circle should be.
- I decided how big the diameter of the circular bed should be and therefore also the radius (half of the diameter).
- I knocked a stake into the centre point of the new circle
- I tied a piece of rope to the central stake and measured out from the stake along the rope to my desired radius length.
- Using some tape, I marked on the rope the desired radius point, in my case 3 metres.
- Keeping the rope tight in my hand, I walked around the new circle, marking its circumference with garden canes pushed into the turf. The taped mark on the rope allowed me to push the canes in at exactly the right points.
- I lifted the turf with a garden spade. The turf was not wasted, we used it for carpeting a new outdoor compound for a puppy.
The method I used took me back more than 20 years, although on a much larger scale, it was just like drawing circles with a compass in a maths class at school!
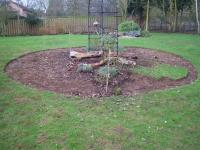
The photo shows the new border near completion, I'm quite pleased with my work.
Filed under Garden Design.
