Build your own Gazebo - Part 1
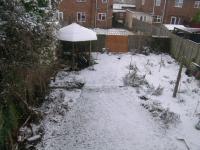 A gezebo can be a useful winter shelter for some plants
One of my favourite places in the garden, somewhere to have dinner with family and friends or to just enjoy the garden in comfort and seclusion is also one of the most expensive items to buy prebuilt for any garden; the Gazebo.
That is why I set about building my very own Gazebo.
A gazebo purchased commercially can cost anything from a thousand upwards. If like me, you would like a gazebo, but can't afford those sort of astronomical prices, then heres how to make a customised, comfortable gazebo for a fraction of the price.
Marking Out
A gazebo can be made with the most rudimentary tools. For my design I started by creating a template for the hexagonal positioning of the six upright posts. For the template I used some spare plastic underlay, cutting three strips about 250cm long and glued them together in an evenly spaced six pointed star. I secured this template in the position I required with a solid peg.
Erecting the Posts
At the ends of each point I dug a hole 18 inches (45cm). Once dug, I filled each hole to 15cm deep with coarse gravel (recycled from some earlier hard landscaping). This will provide a drain sump so that the posts will not sit and rot in standing rain water. I used the amount of gravel to adjust the vertical limit of six 8-foot fence posts having used a spirit level on a bridging bar between them to ensure that the tops of each post would be level with all the others. I set the posts in concrete (mixed away from any growing plants or grass). So there we have it, a level topped henge of six posts.
Finishing the Frame
I joined the posts in a hexagon with bars of 2x2 inch rough cut wood, the ends being cut at angles so that the outer tips were flush with the posts outer edges, each beam meeting tip to tip. They were secured with suitable screws. Then came the hard bit, creating the roof.
The Roof
I cant give you exact measurements here because, like Chinese whispers, things develop according to how accurate the previous work has been. As a rule of thumb the eaves of the roof need to meet in the middle where they all attach to a key, a round (or hexagonal) off cut of thick fence post about a foot long. They then reach down at a pitch of 20 degrees to each post like the spokes of a wheel and are secured onto the beams with eighteen inches of additional overlap.
If you get this right, your roof frame should remind you of a pagoda style roof. It should also bear your weight as the finished roof will take a battering from the elements and isnt the sort of thing you want sailing off to crush the cat or ruin your beds! Best not to test this by climbing on top. Its a long way down.
Now you need to find a cheap source of Larch lap. I went to a very friendly saw mill. Buying direct from source and cutting out the DIY store is an excellent way to shave off the cost, plus saw mills (and especially fresh Larch lap) smell wonderful. What is more, you can do your bit to support the local economy and skilled employment.
About 50 metres of Larch lap (which looks like the individual slats youd find in a fence panel) should be sufficient. It all depends on how big your structure ends up being. The first thing to do with the Larch lap is create a skeleton frame to support the roof felt that will go on top of it. Two hexagons of lap around the upper, outer borders of the roof eaves should prevent the felt from sagging. Once these are on, cover each of the six triangular sections of the roof with one of six over lapping triangles of felt nailed sparingly into place. How you do this is up to you. A tip: Imagine you are water. Where would you run?
Right now your gazebo looks like a shoddy, giant, Vietnamese Cooley hat. Dont be disheartened. It will soon be looking beautiful. After a lot of measuring and sawing, it should be possible for you to cover the gaps between each roof eave (now constricted from view by felt) with overlapping lengths of Larch lap. Each lap will get shorter until you reach the key stone at the very top of the gazebo roof. The ends of each lap need to be angled so that, when nailed in place, they follow the line of the eaves beneath them at each end.
You should use galvanized nails for this. Drill pilot holes through the Larch lap to prevent them splitting as you hammer the nails into place. Each time you start to get near the apex you will more than likely be on very summit of your step ladder. For that reason, youll need someone to stop it from falling away from you as you lean over the roof. After all, you dont want to crash through your painstakingly measured, cut and fitted slats and felt, do you? If you have no-one at home, invite a friend for a cup of tea then hit them with the bad news as they arrive!
Nearly there. You now have a winter shelter for all your junk and bicycles (pictured).
This article was written by Joe Munford.
Filed under Garden Design.
Recommended Reading
The Garden Plant Series
5 stars - A collection of books that are amongst the best when identifying and building up knowledge of a huge range of plants.
Read our review...![]()
